An overview of how basic Postural Restoration Insitute and Dynamic Neuromuscular Stabilization principles can be used to improve your performance under the bar.
On their own, they can look like a lot of rolling around on the ground, blowing up balloons, and ultimately not really lifting weights or doing anything close to powerlifting, but with some application, they actually make for some pretty darn good powerlifting training modalities when it comes to improving movement quality and performance.
TL:DR Version
This is a 3 part series.
If you’re a trainer:
- As always, respect the structure, build a good foundation/alignment, and generally things will fall into place with more complex skills,
- If you don’t already, work on some frontal/transverse plane control work through the trunk/hips…
- Favoring left hip rotation via left hamstrings and adductors/right glute max in your supplemental work can be a very useful tweak to otherwise symmetrical training
If you’re a powerlifter:
- As much as you think you might be bracing, you can probably do a better job by getting some of the deeper “core” muscle to work in sync with the rest of them by creating better IAP,
- Asymmetry exists within your body and as such, training symmetrically all the time might not be the best course of action, especially with your accessories. Some of your lower body accessory work and/or warmups should be asymmetrical to counteract this,
- Instead of mindlessly stretching as a warmup, address the problem head on with some of these asymmetrical exercises I showed above. They’ll not only feel good and get you better warmed up than foam rolling, but they’ll also help you move better and more efficiently. More efficiency=more weight lifted. Hard to argue with that.
For anyone who has trained with me for powerlifting in person over the last couple years, you’ll know that I draw a lot of the stuff that I do outside of the standard exercise programming (percentages, block structure, etc) from the Postural Restoration Institute (PRI) and Dynamic Muscular Stabilization (DNS). These are both systems which focus around the role of the diaphragm, and breathing’s impact on movement mechanics.
On their own, they can look like a lot of rolling around on the ground, blowing up balloons, and ultimately not really lifting weights or doing anything close to powerlifting. While on the surface this may be true, with a little application of the principles from both and some creative thought, they actually make for some pretty darn good powerlifting training modalities when it comes to improving movement quality.
The goal of this series is to go over bridging the gap between the surface PRI/DNS stuff and making it apply to your powerlifting training to help with rehab/injury mitigation, and downright performance. Down the line, we will get into benching, deadlifting, and accessories, but for the time being, the focus will be on the squat.
That being said, let’s dive right in.
Talk to any powerlifting coach, and you’ll probably hear the words “get tight” or “brace” about 50 times within an hour of training with them. While this point gets hammered home, I feel it’s something most people still aren’t getting right.
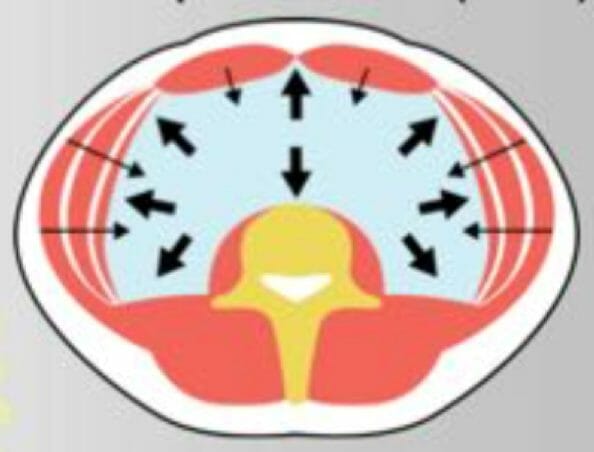
An effective brace is going to create 360 degrees of expansion and intra-abdominal pressure (IAP) in the mid-section. This will create a stable foundation to work from with everything else. Without this, any other corrections you are making are putting band-aids on an underlying dysfunction.
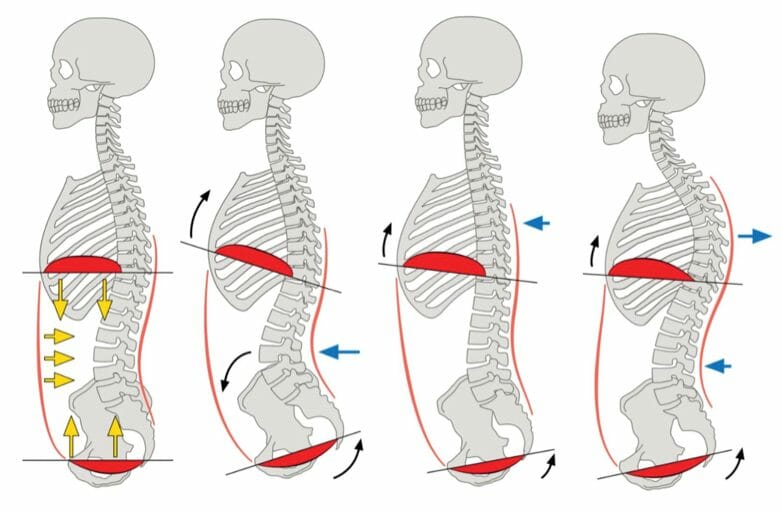
When going through a bracing progression, we want to first create a good alignment between the spine, ribcage, and pelvis (think of a capsule shape), then learn to inflate with this position, followed by a brace/tensioning.
Step 1: Regulating breathing patterns to create a good position to brace from.
For the squat, we are trying to get more ab/hamstring/adductor involvement so that the lats and quads can work as prime movers instead of working double time as stabilizers. This translates into better strength expression.
This type of exercise would generally take up 3 minutes or so in your warmup. It serves to promote better alignment so that your brace works to reinforce that position as opposed to trying to brace in a compromised position and losing a lot of power/stability.
Step 2: Building a brace
Now that we have a good alignment to work from, we can begin to raise the thresholds by way of challenging a brace.
The main technique here is to lock your jaw and imagine trying to yell as loud as possible without letting any air out. You should feel a lot of engagement in your abs as well as an increase in blood and abdominal pressure.
Step 3: Creating movement with the brace
Once we have set a good position to move from and can create IAP in that position, we take it off the floor and start to practice the pattern we want to. For today’s purposes, we are going through a squat pattern, focusing on maintaining the brace should be the main key here and will dictate the load and tempo that you use. These are generally best suited for once you are under the bar and doing your warm-up sets, or just before. If you don’t feel your abs, hamstrings, and adductors working, you’re probably in need of doing through another round of step 1 or slowing down.
Bonus: Asymmetries in the Squat
Even though the squat is a relatively “symmetrical” movement, there are some natural asymmetries in the body that can present themselves in the squat as a hip shift or the bar rotating (aka. The “Helicopter Squat”).
If you can perform steps 1 and 2 but then get to step 3 and start to rotate, it might be worth looking into the frontal plane and developing more control there by way of a close proxy that lets you work into the opposite asymmetry.
For example, if you have a hip shift to the right, or your right knee falls in all the time (weak right glute, weak left adductor), you would want to strengthen those muscles while inhibiting the antagonistic muscles (left glute, right adductor). This can be accomplished with front or both feet elevated split squats by opening the right hip and closing the left hip when they are the front legs in the split squat.
Your ankle and knee angles should come close to your normal squat pattern. Specifically, if your knees come forward in your squat, your knees should come just as far forward in your split squats.
That’s enough to start with for today. I will have more parts to this series outlining how to apply the principles to bench, deadlift, and accessories in the near future.